
BROOKINGS – Are you already thinking ahead to Christmas presents and wondering how you will afford them? I know everyone’s a little short on money this year with COVID-19 hitting us in the wallets.
Here’s an idea: MAKE Christmas gifts this year.
It’s usually much less expensive to make something than it is to buy it ready-made. Grandparents LOVE stuff made by the kids; I guarantee they’ll treasure it, even if it’s a little lopsided.
I’ve compiled some ideas: some would make great gifts; some are cool things for kids (or adults) to keep for themselves.
The trick is to get the supplies you need now.
Most importantly, be original.
Scarves
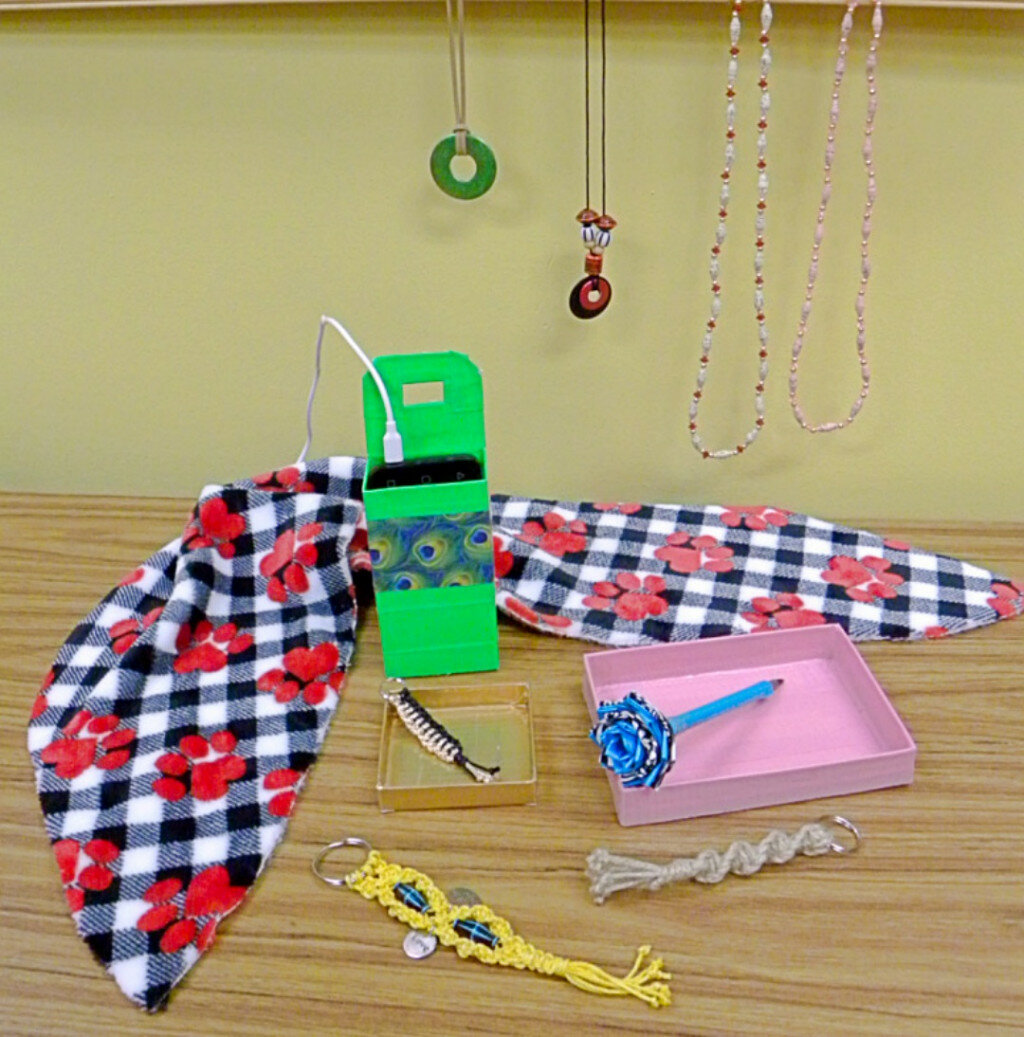
With the weather getting colder, it’ll soon be time for scarves. These are easy make with some fleece fabric. All I had to do is cut out the paw print fleece – no sewing required because fleece doesn’t ravel.
You can cut out looooong rectangles that wind ‘round and ‘round and ‘round, or shorter ones with an oblong shape that are meant to be worn under the coat with the ends just crossed over each other.
If you want to sew a decorative border around it, you can.
Personalize them with fringe, stitched-on appliques or embroidered initials.
If you can afford it, have the kids make some extra and take them to school for kids who don’t have scarves, or donate to a local charity who will distribute them as needed.
You can crochet or knit scarves from simple stitches or sew decorative scarves out of small amounts of fabric like silky fabric, gauze or cotton. Free patterns are available on the internet or look for patterns in stores.
Instead of buying fabric, you can make scarves out of old T-shirts. The simplest: cut a T-shirt off under the armpits and it’s an infinity scarf. More elaborate designs will probably require a little bit of sewing depending on the style you chose.
Take those old T-shirts your kid has outgrown or no longer wears and cut the logos into the shape you want – squares and rectangles work well – and sew into a scarf or quilt for a great keepsake. See “T-shirt Scarves: The Art of Repurposing” on catheholden.com.
You can also make mittens, hats and scarves out of old sweaters you don’t use any more. See “DIY no knit cowl” on wecanmakeanything.net, “DIY Sweater Hat, Gloves, & Scarf Upcycle” on jennifermaker.com. The site “30+ Fabulous DIY Sweater Repurpose Ideas and Tutorials” on fabartdiy.com has instructions for boot socks and armwarmers, too.
Other instructions are available on the internet.
Pillows
You can make pillows from store-bought fabric using prints with favorite motifs like animals or shoes to customize the gift for your friend or relative.
Trim them with fringe, pom-poms, or lace; sew letters on the pillows, do appliques, quilt some pieces for the front, embroidery or whatever you like.
You can make pillows in the shape of alphabet letters. Patterns or instructions are available online.
Got a drafty door or window? Cut a strip of fabric as long as the door or window is wide, then fold it in half, sew up one short end and the long side, stuff with fiberfill, sew up the second short end, and throw in front of the draft to keep out the cold. I’ve seen them decorated to resemble a cat or dachshund dog.
Speaking of critters, simple pillows are great for them to curl up on for a bit of warmth.
Pet gifts
Old t-shirts and sweaters are great for making a blanket, coat or cushy bed for your favorite furry friend.
If your favorite pooch has short hair and needs some help keeping warm, you can make him a dog coat – a great way to recycle those old sweaters.
Look for ideas on the internet, like thecottagemarket.com for 35 dog coat ideas, instructables.com for teeny tiny coats out of socks for toy breeds, and wonderfuldiy.com for coats and beds out of sweaters or t-shirts.
Necklaces
I saw some cool washer necklaces on craftysoccermom.blogspot.com along with some necklaces made from duct tape beads. I have necklaces my mother made from paper beads years ago. “The 20 Weirdest Things You Can Do With Duct Tape” on bobvila.com has an idea for duct tape wrapped around plastic straws, then cut to size.
I’ve made a simple version of the washer necklace: Just buy the washers – Runnings sells them by weight, I got three for 20 cents and another three for 25 cents. Make sure they are clean, then paint.
I painted mine with fingernail polish from Dollar Tree; you can experiment with markers, or different kinds of paint, like spray paint. Make sure to follow directions on the container; some of the fumes can be toxic. If you want to finish with a coat of nail polish or shellac or something else clear, you can.
When everything’s dry, take some cording, string, or suede thong and attach the washer with a larks head knot, then tie the ends together in a square knot. (Some macramé terms you better learn, I’ll be using them again.) Before you knot it, make sure it’s long enough to fit over your head.
You can use just one washer or multiple washers layered on top of each other in different colors. Add beads or charms; use multiple cords so you can add knots to make it really one-of-a-kind. If you’re using a big enough washer, you can write on it: your school’s letters, “I love you, Mom,” your name, or whatever you want.
Keychains
Keys are pretty important things; you never want to lose them. Make sure your wad of keys stands out from the pack with a homemade keychain.
Macramé is an easy way to make a bunch of keychains quickly. You and your friends can make several and give them to each other or have a keychain-making party and make all the keychains you need for your gift-giving. They make great presents for school teachers, piano teachers, 4-H or Scout leaders, and the like.
You can keep it simple with one type of cord and one or two knots; or go elaborate using different colors of cords, multiple knots, beads and charms.
Get some metal key rings and attach cords with larks head knots. You can use two cords doubled over for four cords or add more, depending on how beefy or elaborate of a design you want to make. Some of the basic knots are the square knot, the half square knot, and the half hitch knot. If you want to try something fancier, go with the Josephine knot or a Celtic knot.
Depending on the configuration you choose and colors of cording you use, you can get a whole different look every time. Grab cording in your school’s colors and do half hitch knots until it’s as long as you want – understated simplicity. I made a black and gold key chain out of some leftover cording – high impact with the contrast. I made another one out of jute cord with half square knots for a spiral effect. I went a little more elaborate for a third keychain with yellow cording, multiple knots, beads and charms.
The cording you choose is very important and will have a huge impact on how your project looks in the end. You can use just about anything from jute which has a rough texture, to something smooth like paracord; from heavy cords all the way to something as fine as embroidery floss.
Check out “25 DIY Macramé Keychains with Instructions at ideas4diy.com for ideas from simple to fancy.
Another source is “How to tie a half hitch knot and square knot for your friendship bracelet” at nbeads.com.
Square knots, half-square knots and half-hitch knots can all be used for keychains, bracelets, belts, lanyards, purses, wall hangings, and other things – just search online for ideas. One easy one to try is “How to Make a Paracord Lanyard” at paravival.com.
Not into macramé? For other types of keychains, check out “50 DIY Keychains for You, Your Friends and Your Family!” at diys.com for everything from leather, ribbon, wood, beads, trinkets, glass, yarn, silverware, fabric and buttons, an old baseball, stamped metal, old maps, pennies, clay, felt, soda cans, and more.
Flower pens
Speaking of duct tape, you can find some really cool projects for duct tape on the internet. I was gifted a flower pen from some very crafty girls I interviewed years ago. You can customize with different colors and patterns for all your loved ones.
Sites to check out are “17 Surprisingly Glam Duct Tape Crafts” on diys.com and “How to Make a Duct Tape Flower Pen” on wikihow.com online.
Trays
Got a cardboard box with a separate lid? Then you can make a tray. Larger ones can sit on the dresser to show off special trinkets, like fancy perfume bottles. Smaller lids can be put on the nightstand to collect items like alarm clocks or eyeglasses so they don’t roll off, or on the bathroom counter to hold rings you don’t want falling in the sink when you’re washing your hands.
Shoe boxes, jewelry boxes and candy boxes have lids that can be used. Decide what you want to keep in it and choose a box that fits that need. I made one from pink duct tape and a Russell Stover chocolates box, and used gold duct tape to make one from a Wink’s Fine Jewelry box (thanks, gals).
For a special touch, add a monogram or other decoration in the center.
You can use wild patterned duct tape or keep it simple and use a solid colored one.
Not into duct tape? Then use paint, decoupage, paper or fabric to cover it.
Check out “17 Surprisingly Glam Duct Tape Crafts” on diys.com online.
You can also make trays out of old drawers from dressers or cabinets, drawer fronts, casserole servers, picture frames, various crates and a bunch of other things just search online for DIY serving trays.
Cell phone pouch
Is your cell phone always laying around on the floor when it’s charging? You might want to check out “15 DIY Phone Charger Holder Ideas” from ideas4diy.com, which features cell phone holders made from a plastic bottle, a cereal box, (no sew) jean pocket, fabric, or even crocheted yarn.
I made one from an antiperspirant/deodorant box and some duct tape in lime green and peacock feather print.
If you don’t like seeing phones or cords, or if that light from them bothers you while sleeping, there are options made from decorative boxes, wall-mounted cabinets, a vintage suitcase, books and shoe boxes on “20 Genius DIY Phone Charging Stations” on housebeautiful.com.
If you’re feeling more ambitious, you can make cell phone holders that hang from a purse strap or belt or are small purses onto themselves.
There’s a leather pouch and a candy box pouch on “Give Your Phone Case A Makeover With These 25 DIYs!” on diys.com, “How To Make A Padded Phone Pouch” on weallsew.com, and phone pouches that look like ice cream bars or ice pops on “Keep Your Cool Smartphone Case Sewing Pattern” on straightstitchsociety.com, plus YouTube videos galore, like “D.I.Y. Candy Box Purse.”


